Reformatting your
Windows XP computer will
erase everything on your
hard drive and reinstall the
operating system. To avoid
losing your data (documents, pictures,
music, etc.), you will want
to backup your
information prior to
reformatting. See the more information. After
you have reformatted
your computer, you will
need to reinstall all of your
personal data, as well as
any software products you may use (for example,
Microsoft Office, iTunes,
Symantec AntiVirus, etc.).
Reform
atting your
Windows XP computer has
three main parts:
Reformatting the computer
from your operating
system CD.
Reinstalling the drivers
that came with your
computer.
Running Windows Update
to reinstall all security
updates and patches.
Please contact the ITS Help
Desk (384-4357) prior to
reformatting your
computer if you have
questions about any of
these processes involved.
NOTE: If you have a network connection,
please unplug from the
network before starting installation.
1. First, make sure that
your computer is set to Boot to CD . This is a different procedure
depending on your
computer. When your
computer first boots look
for an option to enter the
BIOS settings. Under the BIOS settings find the "Boot
Order" and make sure the
CD-ROM is set to boot first.
If you have any problems
with this please contact the ITS Help Desk at 319-384- HELP. .
2. With the Windows XP CD
in the CD-ROM drive, save
your BIOS settings and
exit. .
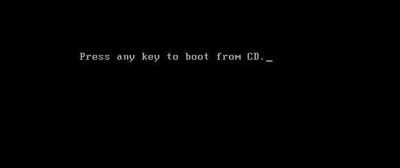
3. If you've done
everything correctly you
should be asked to "Press
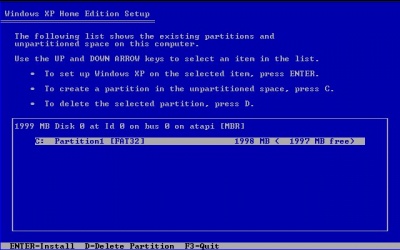
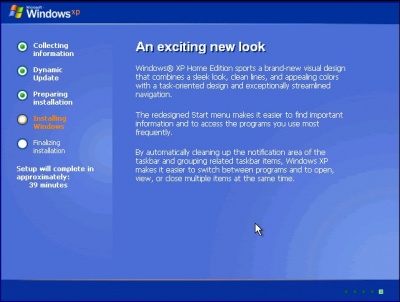
Any Key to Boot from CD". 4. After installing the
necessary setup files,
Windows XP will display
your partitions. Delete any
existing partitions by
selecting the desired partition with the arrow
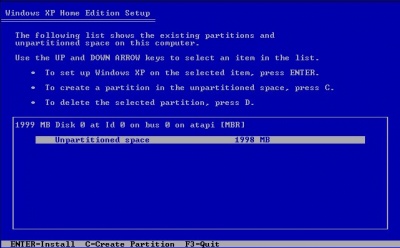
keys, press D to delete and then L to confirm the deletion. 5. You should now have
only one option,
"Unpartitioned Space".
Press Enter to install Windows XP to the
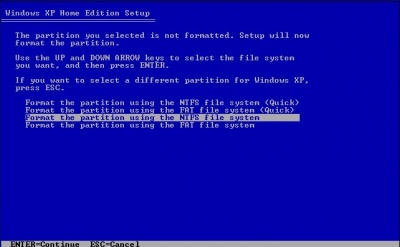
unpartitioned space. 6. When asked how you
would like to format the
partition, select "Format
using the NTFS file system". 7. After the partition is
formatted, Windows XP will
begin installation. The
computer will reboot.
While the computer is
rebooting, please do not touch any keys. From now
on the screens will look
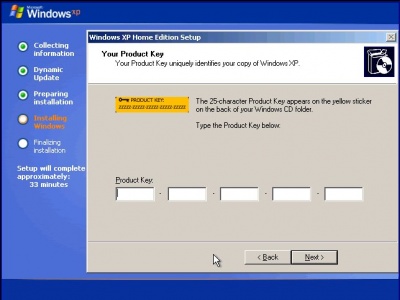
like the following: 8. Enter your product key.
If you purchased Windows
XP from the IMU Bookstore,
the product key will be
located on the back of the
sleeve your CD came in. If you are reformatting using
a Windows XP CD that came
with your computer, the
product key may be
located on a sticker
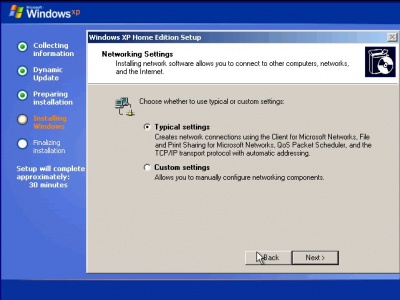
somewhere on your computer case. 9. When asked for
Network Settings, choose
"Typical Settings". 10. Windows XP will now
complete installation. Upon
completion you will need to
re-install the drivers for
your hardware (Modem,
Sound, Video, etc). Many PC companies such as Dell,
Gateway, and HP will
include a "Driver
Installation CD" with the
computer. Simply insert
the CD and follow the instructions. Otherwise,
you can download current
drivers from many
manufacturer's support
web sites. If you have any
problems please contact the ITS Help Desk at 319-384-HELP.
11. Next turn on the
Internet Connection
Firewall. Instructions to
turn on the Internet
Connection Firewall can be
found here.
12. Reconnect your
computer to the Network.
13. Run Windows Update
by opening Internet
Explorer, then clicking on
Tools -> Windows Update.
Follow the on-screen
instructions for installing critical updates.